How to add WebAssembly to a web app
WebAssembly is the new, hot thing! Just kidding. It has been around since 2017. It’s (almost) a 10-year-old technology, ancient, by the JavaScript framework standards. Nonetheless, if you have been doing regular web stuff in the last decade, you probably have heard of it but, never or very rarely touched it, let’s change that.
In this guide we’re going to explore how simple it is to integrate WebAssembly into a web app using the Rust programming language and tools.
Overview
So what is WebAssembly? To put it in simple terms, it’s a binary format for the Web.
Some of its design goals include: being fast (near native code speed), safe (runs in a sandbox environment) and language-independent (can be compiled from a variety of languages). It initially targeted just the Web but has since evolved to be a sort of universal, portable, binary format that can run in other environments, such as servers or embedded devices.
Why would you want to use it? Well, in your projects, depending on their scale or nature, it’s likely that you encountered situations where you wished that the code would run faster. Or maybe, it required some tech that couldn’t run on the browser and you had to defer to a server. It’s in these kinds of scenarios — especially when it comes to pure computation — that WebAssembly shines! Some of the web apps that you use daily at work, such as Figma, Google Meet or Zoom, use it, to handle expensive or complex calculations.
To create a WebAssembly program, you typically turn to a low-level language, such as C, to generate a .wasm file. This file can then be loaded into your web app, exposing methods to be called by JavaScript. This process of loading the .wasm file requires a bit of boilerplate code that can be hard to understand. Fortunately, some modern solutions abstract this part for us, so we can focus on what matters.
Although low-level languages are often the preferred choice for compiling to WebAssembly, there’s a variety of options at your disposal. You can even compile to it from COBOL or Pascal!
Who are you people?!
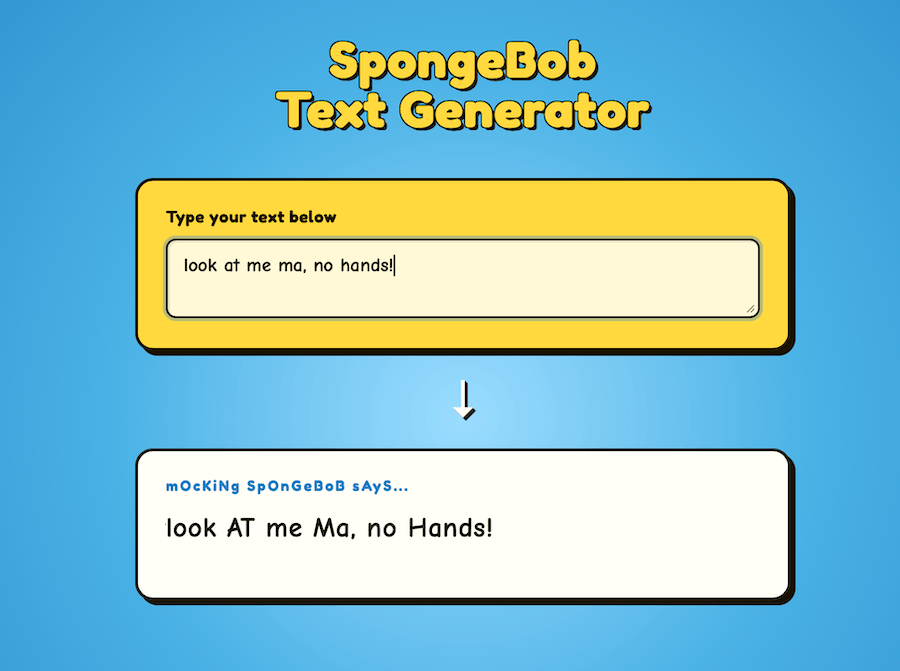
For this guide we’re going to build a mOckIng TExT geNeratoR, like those seen on SpongeBob memes. Genius level idea, I know. But hopefully you’ll learn something useful in the process.
 Your average JS developer
Jokes aside, here is a demo similar to what we’ll be creating. When you type in the text input, it renders the text in the box below with each letter randomly set to uppercase or lowercase.
Let’s start! We’ll use Vite to create the web app. Run the following command in your terminal to create the web app:
npm create vite@latest
During the setup set any name of your liking for the app name and then set the following options:
- Framework: Vanilla
- Variant: TypeScript
After the app has been created, we’ll need to do some cleanup to remove unnecessary code and files:
- Delete the
src/assetsfolder - Delete the
src/counter.tsfile - Edit the
src/main.tsfile and delete everything other than the first line:import "./style.css".
Your project tree should look something like this:
app-name
├── index.html
├── package-lock.json
├── package.json
├── public
│   ├── favicon.svg
│   └── icons.svg
├── src
│   ├── main.ts
│   └── style.css
└── tsconfig.json
Now to add the contents and styles for our web app:
- Edit the
index.htmlfile and replace its contents with the code available here. - Edit the
style.cssfile and replace its contents with the code available here.
Run the following command in the terminal to start the web app:
npm run dev
Navigate to http://localhost:5173 and if all went as planned, you should see something like this on your browser:

Crab attack!
As mentioned before, we’ll use a low-level language to generate the .wasm file. For this example we’ll use the Rust programming language. Rust is a widely popular, modern, low-level language. Well known for its performance and memory-safety features. It also has very good integration with WebAssembly.
 Ferris, the unofficial mascot of Rust
If you’ve never touched Rust before, don’t worry, the code itself will be quite simple. Meanwhile, go ahead and install Rust if you don’t have it yet. It’s ok, I’ll wait…
Follow the instructions available here to install Rust in your system.
All good? Ok! We’ll use cargo (the package manager for Rust) to generate a new project. Go ahead and run the following command in the project root:
cargo new --lib wasm
This command creates a new package named wasm. We could have chosen any other name, it has no special meaning. If all went well, you should see a new directory in the project root:
wasm
├── Cargo.toml
└── src
    └── lib.rs
The lib.rs file is where we’re going to place our code to generate the WebAssembly module. But before that, there are some dependencies that we need to take care of.
Edit the Cargo.toml file and add the following:
[dependencies]
wasm-bindgen = "0.2.120"
getrandom = { version = "0.4.2", features = ["wasm_js"] }
rand = "0.10.1"

[lib]
crate-type = ["cdylib"]
Run the following command to install the new dependencies:
cargo check
I’ll briefly go over what was added. The getrandom and rand packages are for the random number generation, to randomly set each character to either upper or lowercase. The wasm-bindgen package is the main library that will generate the .wasm module, as well as some JS glue code to facilitate the integration into our web app. Finally, the [lib] section specifies what kind of artifact will be produced when the project is compiled. In this case, a C compatible dynamic library, a requirement for a .wasm module.
One last dependency remains: wasm-pack. This is a build tool for compiling the Rust code into a neat NPM package that can be easily imported as a simple dependency of our web app.
Run the following command to install it:
cargo install wasm-pack
It’s assembly time!
It’s finally time to do some coding. Let’s start with the lib.rs file. Replace its contents with the following:
use wasm_bindgen::prelude::*;

#[wasm_bindgen]
pub fn get_mocking_text(text: &str) -> String {
    text.split("")
        .map(|char| {
            if rand::random_bool(1.0 / 3.0) {
                char.to_uppercase()
            } else {
                char.to_lowercase()
            }
        })
        .collect()
}
Without going into much detail, we’re simply defining a method that accepts a string, iterates over each character and randomly sets it to either upper or lowercase.
The magic bit happens in the #[wasm_bindgen] line. This is called an attribute macro in Rust and by adding it above the method we’re basically telling to the Rust compiler: “Hey, I want to expose this to the JavaScript context!”. Simple, right?
That’s all there is for the Rust code. Let’s compile it. Run the following command inside the wasm directory:
wasm-pack build --target web
 Compiling time!
After the build completes you should have a new pkg directory available:
wasm
├── Cargo.lock
├── Cargo.toml
├── src
│   └── lib.rs
└── pkg
    ├── package.json
    ├── wasm.d.ts
    ├── wasm.js
    ├── wasm_bg.wasm
    └── wasm_bg.wasm.d.ts
Here’s our .wasm file! Look at it! There’s also a wasm.js file that includes the boilerplate code for loading the .wasm file. Lastly we have some TypeScript type definition files and, a package.json. This is the local npm package that we’ll add to our web app.
Open the package.json file in the project root and add the dependency to the pkg directory:
{
  // ...
  "dependencies": {
    "wasm": "file:wasm/pkg",
  }
}
If you’re using pnpm use
link:instead offile:
Run the following command in the project root to install the new npm dependency:
npm install
Now if you peek inside the node_modules directory, there should be a shortcut to the wasm folder. That’s it for creating the WebAssembly code.
Final segment
This is the last stretch. All that remains is adding the TypeScript code to the main.ts file to load our wasm module and use it.
Edit the main.ts file and add a new import:
import init, { get_mocking_text } from "wasm";
In the line above we import two things. First the init method, that loads the .wasm file and second, the get_mocking_text method that we created in lib.rs.
Next, let’s create a main method with the logic of the web app.
Add the following to the main.ts file:
function main() {
  const textInput = document.getElementById("text-input")!;
  const preview = document.getElementById("preview")!;

  textInput.addEventListener("input", (ev) => {
    const target = ev.target as HTMLInputElement;
    const result = get_mocking_text(target.value);
    preview.textContent = result;
  });
}

init().then(main);
Once again, the code itself is quite simple, our method simply finds the DOM elements for the text input and the preview area, attaches a listener to the input event of the text input and calls the Rust method with the value of the element. Finally, it takes the result and displays it in the preview area.
In the last line we call the init() method imported earlier to load the wasm module and, since it returns a Promise, we call .then() with our main as callback argument.
That’s it! Try typing in the text input and see how the text changes in the preview area.
A live example is available here and the complete source code here.
Conclusion
Hope this guide was educational and useful for you. If you never dealt with WebAssembly or Rust before, congratulations! Go ahead and update your Linkedin profile! Just kidding.
I know that this example was rather basic and not really demonstrative of all features WebAssembly is capable of but it’s important to start with baby steps. It’s also important to just be aware of it, so now you know, and that’s cool!
If you’re interested in learning more about it, webassembly.org has a resources page with other sources you can explore.